
At it’s broadest level, stocktaking is the counting of a business’s items. Whether you wish to count only a select few items, the whole lot, or only count those in particular locations are factors for consideration. The aim of doing a stocktake is to check whether your business system, Business Central or otherwise, has an accurate recording of what’s truly available. With all this in mind, let’s have a look to see how Business Central functionality allows users to perform a count and rectify any issues that arise as a result.
Establishing the ‘what’ and ‘where’
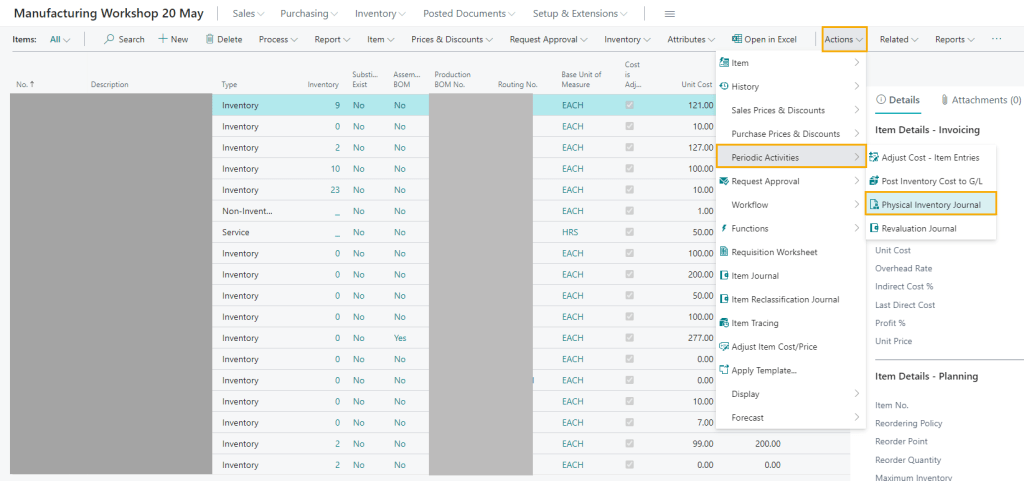
In Business Central, the Physical Inventory Journal is where you will run both of these concepts. This can be reached using the search bar or from the Items page, as shown below.
Within the Journal, the next step is to either ‘Calculate Inventory’ or ‘Calculate Counting Period’ based on your requirements. Within the Calculate Inventory option, users are granted the flexibility to filter, by Item or Location for example.

As the physical checks will have to be undertaken, a good starting point after generating the Items and the Qty. (Calculated) is to go to ‘Actions’ and ‘Print’. From here you can choose which filters are relevant but this page allows you to print out what is essentially a checklist for the stocktaking. You can filter this multiple times, by Bin or Location, and print it out numerous times for different sets of people, so that not everyone is in each other’s way trying to count the stock.
Once the stock count has taken place, in the Physical Inventory Journal, in the Qty. (Phys. Inventory) column, enter the number of the particular items actually found. The Qty. (Calculated) column is non-editable. Once you have made the necessary alterations, the Entry Type field will have either a Positive Adjustment or Negative Adjustment value entered.

Next, go to ‘Actions’, ‘Posting’, ‘Test Report’ and if you click to preview, a report showing the value change by positive or negative adjustment will be shown. Once, you’re happy with that, feel free to post the document. Any changes to inventory levels will be displayed in the Item Ledger Entries.

Managing serially tracked items with stocktaking
Serial numbers are significant to this topic because they are independently tied to items. Deleting an item which has serial tracking requires you to specify which individual item it was. On the flipside, adding a serially tracked item to the system requires an input as to what serial number that item has.
Removing serially tracked items
To remove serially tracked items, on the Physical Inventory Journal, reduce the number of stock in the Qty. (Phys. Inventory) by the number you have lost in the column like before. Next, click on ‘Line’ and then ‘Item Tracking Lines’. From here, click ‘Process’ and ‘Select Entries’. Here, you look to select the serially tracked item that is no longer available. After making sure the Base Quantity has an entry as well as the Location, where necessary, close this part down and post.
Adding serially tracked items
Adding serially tracked items is a similar story. Again, you change the Qty. (Phys. Inventory) by the number you wish to add to the system and then click ‘Line’ and ‘Item Tracking Lines’. Here, type on the Lines the serial numbers of the newly found tracked items and add a quantity in the Quantity (Base). Make sure that for each new item you are entering, you use a separate line. Alternatively, you can click ‘Actions’ ‘Functions’ and ‘Create Customised SN’.
Cycle counting
Following the extremely broad description of stocktaking given at the start of the blog, you may be wondering what cycle counting is. The difference between this and the former is that this looks to separate out items for the counting process. You may have one extremely valuable item, of which you only sell 10 a year. The limited input of data and low quantity of this item may warrant fewer stock counts per year than something sold on a daily basis. But this example isn’t to limit your cycle counting frequency to these reasons.
On the Item Card, in the ‘Warehouse’ tab, there’s a Phys Invt Counting Period Code. This is where you establish how often you would like a stock count to take place for this item per year. Next to this field will be fields that will be automatically filled after the initial stock count, such as the last date a count occurred.
Running cycle counting is very similar to stocktaking. You reach the Physical Inventory Journal from the Items page and after clicking Calculate Counting Period, you will be greeted by a subpage in which you can filter the items by periods to count. You are able to select all options here, performing the count for all items under each period on the same day.

After establishing which set of periodically filtered items you wish to count, click ‘OK’. The next screen will present a few more fields. You must specify a Document No. for example. You can also specify whether to include ‘Items Not on Inventory’. One key difference at this stage is that you can’t filter by Location Code or Bin Code. When you’re happy, click ‘OK’.
Note, once you have generated the report, you have the capability to do as you did before and adjust invalid inventory quantities in the Qty. (Phys. Inventory) and post the journal.
Closing remarks
This is a basic rundown of how stocktaking and cycle counting can work for you in Business Central. If you have any issues or queries about this topic or another, we’d love to help you. Please contact us if you have any comments or questions!