
In Business Central, there are a host of areas where users can create templates. Templates are useful for having an efficient means of generating an entity, in an efficient and consistent manner. Classic examples include ‘Item’ or ‘Customer templates’. Today we will cover those as well as configuration templates. Let’s start with the most commonly used templates.
Separating out specific record templates and Configuration Templates
In Business Central, there are templates specific to particular record types. However, not all record types in Business Central have their own tailor-made template page.
Templates specific to records
In wave 2 of 2021, Microsoft updated templates. The record-specific templates are now much simpler to handle. There are lots of different records which have their own template pages. Some of the most used are:
- Customers
- Items
- Vendors
- Employees
Using record-specific templates
All of the aforementioned record-specific templates work in the same fashion. To demonstrate their utility, I will use an Item Template as my example.
On the Item Templates page, create a new record.
When you do so, you’ll see all the Item Card fields. As long as a value already exists against a field, by setting it, you will make it a default value. So to clarify, when you are creating a template in this way, you can’t create new values; they must exist already. For example, the Blocked field on an Item Card can only be ‘on’ or ‘off’; It can’t be ‘yellow’ or ‘412’. Note, you can make multiple item templates and pick the appropriate one each time. Below, I’ve created three simple records you might see as examples of item templates:

When you’re happy with the configurations you’ve made, try and create a new Item record. Assuming you have more than one template to choose from, a subpage will appear asking you which template you wish to apply:

Note, you don’t have to accept any of these. You can instead click ‘Cancel’. This will then ask you whether you wish to begin from a blank canvas:

This gives you the flexibility to choose how manual you want the process of making new items to be.
Applying templates
After creating templates, you can apply them to existing records as well as new ones. As you can see below, I’ve selected three records and I can apply a template to all of them at once. See below:

In the ribbon, if you click ‘More Options’, ‘Actions’ and ‘Apply Template’, you’ll get this message:

By clicking ‘Yes’ (potentially once per item you are applying it to), it will apply the values you set against the particular template you chose.
Alternatively, you can apply a template directly from the Card itself. To do so, click ‘More Options’, ‘Actions’, ‘Functions’, ‘Other’ and ‘Apply Template’.
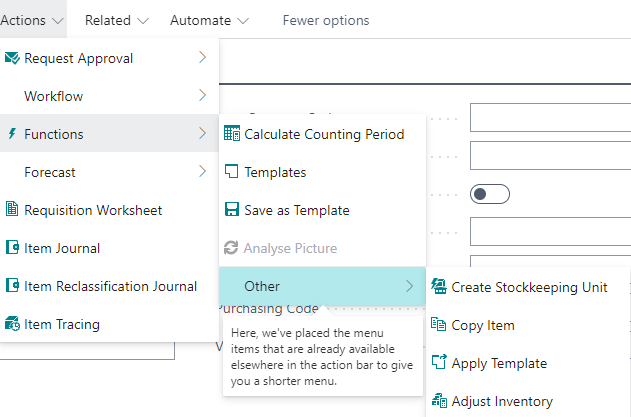
Creating a template from an existing Card’s values
One thing you might have noticed from that image is the ‘Save as Template’ action. As the name suggests, this allows you to copy all of the values set against this particular Card and use it as a template for future items. So for example, if I wish to create a template for 0100 (AI Forecast Item), I can do so by going to the Item Card, clicking ‘More Options’, ‘Actions’, ‘Functions’ and ‘Save as Template’. After saving it and naming it appropriately, I now have an Item Template record which is a replica of the item itself:

Configuration templates
As noted earlier, not all record types have their own specific template page. Due to this, we have configuration templates. These allow users to define templates for records which don’t have their own template pages. For example, Work Centres. You can also use them for records which have their own template pages but it’s not advised as it’s far simpler to use the pages dedicated to them.
A word of warning
Before I continue with demonstrating how to employ them, I will highlight Microsoft have stated “configuration templates are still available to help with developer, data migration, and integration scenarios; however, we recommend using the new customer, vendor, item, and employee templates instead.”
Use new templates with same flexibility as configuration templates – Microsoft, 09/08/2022
So directly from the horses mouth, it’s recommended to simply use the record-specific templates.
Using configuration templates
To create a new Configuration Template record, go to the page of the same name. Once you’re there, click ‘Actions’, ‘New Document’ and ‘New’. Once you’ve done so, you can specify the usual information like the Code and Description value. Importantly, this is where you can define the Table ID. This value defines the page that you wish to create templates for. For example, I know Salesperson records don’t have their own specific template page. So here, I can input some fields that I deem appropriate for that type of template.
As you can see, I’ve established a field value to be set by default for all Salesperson records. Against the Job Title field, all the records will have a value of ‘Sales Executive’.

If you wish to allow for field values that don’t currently exist in Business Central, tick the Skip Relation Check field.
Configuration package
After you create a Configuration Template record on Business Central, you must make sure there is a corresponding configuration package set up. On the configuration package, establish values for the Code, Description, Language ID fields in the header. On the lines, set the Table ID value. This must match the value against the configuration template. In the Data Template field, input the associated configuration template. Finally, make sure the Enabled field is toggled.
The next step is to go to the Configuration Worksheet page. A lot of ‘configuration’ pages I know!
Configuration Worksheet
On the Configuration Worksheet page, if there’s not already a line containing the Table ID matching both your configuration package and template, go ahead and insert one. Set the Line Type field to Table and input the appropriate Table ID. We next need to establish the Package Code. To do so, click ‘Process’ and ‘Assign Package’. Select the associated configuration package:

Next, define which fields you wish to specify in the template. To do so, in the ribbon, click ‘Line’ and ‘Fields’. Make sure the Include Field box is ticked for all the fields you wish to include. Afterwards, we can export the data to Excel. To do so, click ‘Prepare’, ‘Excel’ and ‘Export to Template’.
In Excel, you can make any changes you like to the field values. However, this isn’t necessary. The templated field values will be added after we import the file back into Business Central. Whether or not you make any changes, make sure you save the file. Afterwards, the next step is to import the file back into Business Central. To do so, back on the Configuration Worksheet page, click ‘Prepare’, ‘Excel’ and ‘Import from Template’.

Select the relevant file. On the next screen, click ‘Import’.

After doing so successfully, you’ll receive a notification at the top of the page saying you have imported the file, now you must apply it. To do so, in the ribbon, click ‘Process’ and ‘Apply Data’. After you apply the data, it doesn’t always suggest that changes have occurred, However, if you check the records, the template values you defined will have been applied:

Anytime you wish to update new records with these template values, simply import and apply the package again.
The Templates page in Business Central
Before I finish, I thought it’s worth mentioning there is also a Templates page in Business Central:

However, if you drill into it from the search bar, you will see it actually takes you to the Configuration Packages page:

I just wanted to point out this isn’t another type of template. Strangely enough, you can search for Configuration Templates and this will take you to the same page. I am not sure why there’s two links leading to the same page.
Closing remarks
As always, thanks for reading. If there’s any areas of Business Central you would like to see us cover in future, please let us know. We’d love to hear from you.
To keep up to date with when we post, follow us on LinkedIn.